How to Take Ownership of a Folder in Windows 10
Windows 10's file system can be used to to assign permissions to specific groups and users to access files and folders on a computer.
When you're signed in to your Windows 10 account, you get full control over the files and folders you create, sometimes you may also need access to other files. It could be files from an old account from a user that's no longer around, or maybe some system files you need to tweak edit to customize certain aspects of the operating system.
If you don't have specific permissions, Windows 10 will deny you access. But if your account has administrative privileges, you can take ownership of certain files and folders on your computer.
In this guide, we'll walk you through the steps to take ownership of files and folders on your Windows 10 PC without the need of a third-party tool.
How to take ownership of files and folders
- Open File Explorer.
- Browse and find the file or folder you want to have full access.
- Right-click it, and select Properties.
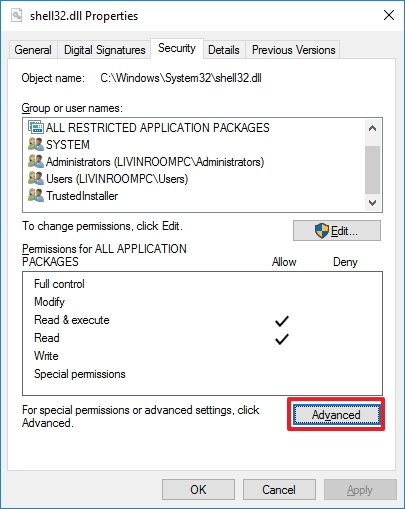
- Click the Security tab to access the NTFS permissions.
-
Click the Advanced button.

-
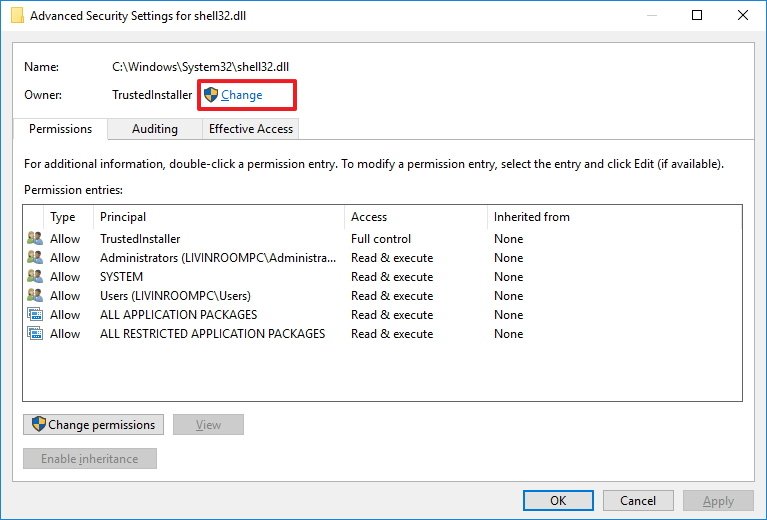
On the "Advanced Security Settings" page, you need to click the Change link, in the Owner's field.

- Click the Advanced button.
- On the "Select User or Group" page, click the Find Now button.
-
From the search result, select your user account, and click OK.

- On the "Select User or Group" page, click OK.
- Click Apply.
-
Click OK.

- Click OK again.
- Click OK one more time to complete this task.
It's important to note that if you're taking ownership of a folder, you can check the Replace ownership on subcontainers and object option in the Advanced Security Settings page to take control of the subfolders inside of the folder.
Now you'll need to grant full access control to your account, to do this use the following steps:
- Right-click the file or folder and select Properties.
- Click the Security tab to access the NTFS permissions.
- Click the Advanced button.
-
Under the Permissions tab, click Add.

- Click Select a principal to add your user account.
- On the "Select User or Group" page, click the Find Now button.
- From the search result, select your user account, and click OK.
-
On the "Select User or Group" page, click OK.

- On "Permission Entry", check the Full control option.
-
Click OK.

- Click OK.
- Click Apply.
- Click OK.
- Click OK to close the file or folder properties to complete the task.
It's important to note that if you're taking ownership of a folder, you can check the Replace all existing inheritable permissions on all descendants with inheritable permissions for this object option in the Advanced Security Settings page to replace the subfolders permissions with the settings from the parent folder.
More Windows 10 resources
For more help articles, coverage, and answers on Windows 10, you can visit the following resources:
- Windows 10 on Windows Central – All you need to know
- Windows 10 help, tips, and tricks
- Windows 10 forums on Windows Central

See more
These are the best 27-inch monitors money can buy
A 27-inch monitor is just about the perfect size without having to sit too far away or whip your head back and forth to follow things across the screen. If you're in the market for a new monitor, check out our top picks.
How to Take Ownership of a Folder in Windows 10
Source: https://www.windowscentral.com/how-take-ownership-files-and-folders-windows-10


0 Response to "How to Take Ownership of a Folder in Windows 10"
Post a Comment